9 Best Laptop Service Centre In Singapore (2025)
9 Best Laptop Service Centres in Singapore (2025) Singaporeans rely on laptops every day — for work, school, and personal use. When your device malfunctions,

The Command + S function on a MacBook Pro is essential for quickly saving work, but when it stops responding, it can disrupt your workflow. This article provides a comprehensive guide to troubleshooting and fixing the issue with the Command + S not working on your MacBook Pro. From simple restarts to more advanced diagnostics, we’ll cover a range of potential solutions to get your Touch Bar and keyboard shortcuts back in action.

A simple restart can often resolve issues with your MacBook Pro, including problems with the Command + S function. Restarting your Mac can refresh system resources and potentially fix unresponsive applications that may be affecting the Touch Bar’s performance. To perform a simple restart, follow these steps:
Before restarting, make sure to save any open documents or work to prevent data loss. This action is particularly effective if an application becomes unresponsive or freezes, impacting the Touch Bar’s functionality.
After the restart, check if the Command + S function has been restored. If the issue persists, you may need to explore further troubleshooting steps or consider resetting the System Management Controller (SMC) as outlined in the next section.
If your MacBook Pro continues to experience issues with Command + S not working, resetting the System Management Controller (SMC) may resolve the problem. The SMC is responsible for managing behaviors related to power, battery, and thermal management, among others. Resetting the SMC is a straightforward process but varies slightly depending on the type of chip your MacBook Pro has.
For MacBooks with an Apple T2 chip or non-Apple silicon:
For MacBooks with Apple silicon, simply power cycle your Mac:
After resetting the SMC, check if the Command + S functionality has been restored. This process can also fix other power-related issues such as charging irregularities, unexpected shutdowns, or fan noise problems.

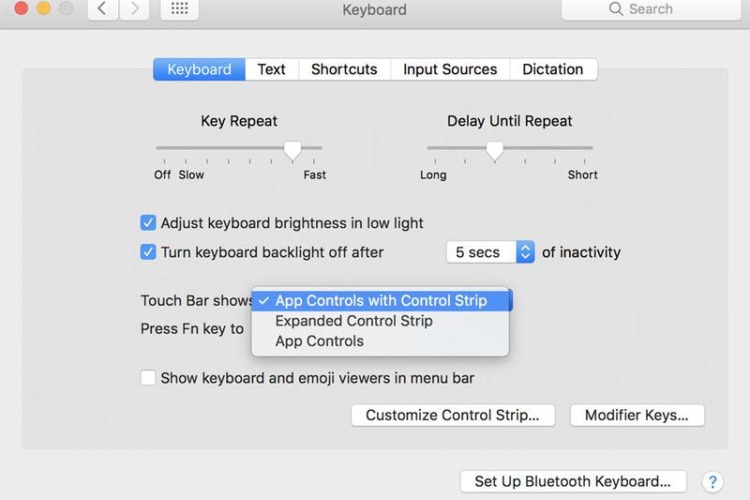
To ensure that the Touch Bar on your MacBook Pro is configured correctly, follow these steps:
Make sure the following parameters are enabled for your device. If they are already enabled, try toggling them off and then back on again. Once you have made the changes, click ‘Done’.
After adjusting the Touch Bar settings, it’s crucial to test the functionality. Press and hold the Fn (Function) key to see if F1 to F12 appear on your Touch Bar as expected.
If the Touch Bar still does not respond correctly, consider other troubleshooting methods such as refreshing the Touch Bar or consulting Apple Support.
To ensure the Touch Bar on your MacBook Pro operates correctly, it’s essential to verify and adjust its settings. Start by accessing the Touch Bar settings in the System Preferences. Here’s a quick guide to help you through the process:
Once you’re in the Touch Bar settings, you’ll find several options that you can customize to your liking. For instance, you can decide what the Touch Bar displays—App Controls, Expanded Control Strip, or a combination of both. If you’re experiencing issues, try toggling the settings off and then on again, which can often resolve minor glitches.
After making changes, ensure to hit Done to save your preferences. This step is crucial as it confirms the adjustments you’ve made.
Remember, if the Touch Bar is still unresponsive after adjusting the preferences, you may need to explore further troubleshooting steps, such as refreshing the Touch Bar or checking for software updates.
Entering Recovery Mode on your MacBook Pro is a critical step when troubleshooting Command + S issues. To initiate this process, shut down your Mac completely. Then, press the Power button or Touch ID button and immediately press and hold Command + Option + R or Command + Shift + Option + R until the Apple logo appears. This sequence will boot your Mac into Recovery Mode, presenting you with various utilities to diagnose and fix problems.
Once in Recovery Mode, you can perform several actions to address system issues:
It’s important to note that if the Recovery Mode doesn’t appear after following these steps, you may need to restart your Mac and attempt the process again. Exiting Recovery Mode is straightforward; simply select “Restart” from the Apple menu or choose your normal boot disk from the Startup Disk option if your Mac keeps booting into Recovery Mode.
Once you’ve initiated Recovery Mode on your MacBook Pro, you’ll be presented with several utilities to help troubleshoot and fix issues. Navigating through these options is crucial to resolving the Command + S not working problem.
To exit Recovery Mode, simply select ‘Restart’ from the Apple menu. If your Mac keeps booting into Recovery Mode, use the ‘Startup Disk’ option to choose the normal boot disk and restart.
Remember, if you’re using a Mac with Apple silicon, you may need to select a user and enter their administrator password after clicking the gears icon (Options) and hitting Continue. Follow the on-screen instructions carefully.

Booting your MacBook Pro into Safe Mode can be a crucial step in diagnosing and resolving issues. Safe Mode performs a check of your startup disk and attempts to repair directory issues, which can often resolve problems related to system stability and performance.
For Intel-based Macs, the process involves:
For Macs with Apple silicon, you should:
Once in Safe Mode, you may notice reduced functionality, but this environment allows you to run essential tasks without the interference of certain software conflicts.
Remember, if System Settings works in Safe Mode but not in normal mode, it’s likely that a peripheral or software is causing the issue. Disconnect non-essential devices and try restarting normally.
Once you’ve entered Safe Mode on your MacBook Pro, it’s time to diagnose the issues that might be causing the Command + S shortcut to malfunction. First, check if System Settings operates correctly in Safe Mode. If it does, attempt a normal restart and access System Settings again. Should the problem persist, consider the peripherals connected to your Mac. Disconnect all except for the keyboard and mouse, and restart.
In some cases, unused applications, extensions, or login items could be the culprits. Uninstall any that you no longer need. This can help free up RAM and potentially resolve the issue. Remember, Safe Mode limits your Mac to essential functions, which can aid in identifying problematic software.
If after these steps the Command + S shortcut is still not working, it may be necessary to assess the security settings. Sometimes, issues with these settings can prevent certain functions from operating correctly.
After rebooting your MacBook Pro in Safe Mode, it’s crucial to test the Touch Bar’s responsiveness. This will help you determine if the issue is related to software conflicts or if it persists even without third-party applications running in the background.
If the Touch Bar operates correctly in Safe Mode, it suggests that software conflicts may be the root cause of the problem. In this case, you can proceed to identify and resolve these conflicts upon a normal system restart. Remember to back up any important files before attempting this fix and proceed with caution.
When the Command + S function fails to work on your MacBook Pro, software conflicts could be the culprit. To identify these conflicts, follow a systematic approach:
Running a comprehensive malware scan is also crucial, as viruses or malicious software can disrupt hardware performance.
Remember, keeping your macOS updated is vital for maintaining system stability and resolving potential software conflicts.
Single User Mode on a MacBook Pro is a special boot option that gives you access to a Unix shell for advanced troubleshooting. To access Single User Mode, follow these steps:
Once in Single User Mode, you will be presented with a command-line interface where you can run various diagnostic and repair commands. It’s a powerful tool for experienced users to resolve complex issues.
Remember, Single User Mode is primarily for those with a good understanding of macOS and Unix commands. If you’re not comfortable using the command line, it’s best to seek professional help or explore other troubleshooting methods.
When faced with persistent issues on your MacBook Pro, such as the Command + S shortcut not working, performing system diagnostics is a crucial step. Apple Diagnostics is a built-in tool that can help identify hardware-related problems. Before initiating the diagnostics, ensure that all external devices are disconnected, except for essentials like the keyboard, mouse, display, and Ethernet connection. Also, make sure your system is updated to the latest version and then shut down your Mac.
To start Apple Diagnostics, turn on your Mac and immediately press and hold the D key until you see a screen asking you to choose your language. After selecting your language, the diagnostic will begin automatically.
If Apple Diagnostics finds issues, it will display an error message along with follow-up steps. Pay close attention to these instructions as they may involve contacting Apple Support or visiting an Apple Store. Remember, this tool is particularly useful for detecting problems that are not immediately apparent through regular troubleshooting methods.
To troubleshoot hardware issues on your MacBook Pro, Apple Diagnostics is a reliable tool. Before initiating the diagnostics, ensure that all external devices are disconnected, except for essentials like keyboard, mouse, display, and Ethernet connection. Here’s how to run the diagnostics:
If Apple Diagnostics identifies any problems, it will display an error message with corresponding reference codes. These codes are crucial for understanding the nature of the issue.
It is essential to address any error codes by consulting Apple’s official support or an authorized service provider.
Should Apple Diagnostics fail to resolve the issue, consider reaching out to Apple Support or visiting an authorized service center for further assistance.
After running Apple Diagnostics, interpreting the results is crucial for identifying the next steps to fix your MacBook Pro. Error codes will guide you on the specific issues your Mac might be facing. It’s important to cross-reference these codes with the official Apple support documentation for detailed explanations and recommended solutions.
If the diagnostics report indicates hardware issues, you may need to contact Apple Support or visit an authorized service provider. For software-related problems, the instructions provided should help you address the issue directly. Remember, it’s essential to follow the given advice closely to avoid further complications.
In some cases, error messages may suggest immediate actions, such as reinstalling macOS or replacing a component. Take these recommendations seriously to ensure the longevity and optimal performance of your MacBook Pro.
When the Command + S shortcut fails to work on your MacBook Pro, it could be due to an application that has become unresponsive or is interfering with system processes. Force quitting these problematic apps may restore functionality to your Touch Bar, including the Command + S operation.
To force quit an application:
Remember, force quitting an app may result in the loss of unsaved data within that app. Proceed with caution and save your work frequently.
If you’re unsure which app might be the culprit, consider closing apps one by one, starting with those that are not essential for your current tasks. If the issue persists after all apps have been closed, further troubleshooting may be necessary.
Clearing the cache can often resolve persistent issues with the Touch Bar. To do this, follow these steps:
~/Library/Preferences/ and find the file named apple.touchbar.agent.plist. Move this file to the Trash.~/Library/Caches/ using the same method. Here, delete all files within the cache folder, but do not delete the folder itself as this could cause further issues.After clearing the cache, it’s a good idea to perform a restart of your MacBook Pro to ensure that the changes take effect and the system refreshes its cache.
Remember, handling system files can be risky; ensure you know what you’re deleting. If unsure, consider seeking professional assistance or contacting Apple Support.
In summary, addressing the issue of Command + S not working on your MacBook Pro involves a series of troubleshooting steps that can restore its functionality. From checking modifier key assignments and force quitting apps to restarting your Mac and refreshing the Touch Bar, each method plays a crucial role in resolving potential glitches. If these initial steps fail, more advanced solutions such as resetting the SMC, booting in Safe Mode, and using Apple Diagnostics can be employed. Remember to back up your data before attempting any fixes and proceed with caution. By following these steps, you should be able to overcome the Touch Bar issues and enjoy the full capabilities of your MacBook Pro once again.
To perform a simple restart on your MacBook Pro, click the Apple logo (), select the ‘Restart’ option, and then select ‘Restart’ again when prompted to commence the action.
To reset the SMC, turn off your Mac, press Control + Option (left side) + Shift (right side) for 7 seconds, then press and hold the power button for another 7 seconds without releasing the other keys. Release all keys, wait a few seconds, and turn on your Mac.
To verify and adjust Touch Bar settings, go to Apple menu > System Preferences > Keyboard, and ensure the Touch Bar settings are configured properly to display the desired controls.
To reboot in Recovery Mode, press and hold the Command + R buttons, then turn on your Mac. This will boot your Mac in Recovery Mode, which can help fix minor errors.
To enter Safe Mode, restart your Mac and immediately press and hold the Shift key until you see the login window. Safe Mode runs only vital functions, which can help identify software conflicts or malfunctions.
To test Touch Bar functionality in Safe Mode, reboot your MacBook Pro in Safe Mode as described above and check if the Touch Bar responds accurately. If it does, there may be software conflicts causing the issue.
To use Apple Diagnostics, restart your Mac and immediately press and hold the D key until you see the Apple Diagnostics interface. Follow the on-screen instructions to start the diagnostic process.
To refresh the Touch Bar, launch the Terminal app, enter the command ‘killall ControlStrip’, and hit Return. This should reset the Touch Bar and resolve any glitches.
Got a struggling Macbook that’s bringing your productivity down? Don’t stress about the steep costs normally associated with Apple repairs. Volta PC Upgrade & Repair in Singapore provides expert and surprisingly affordable Macbook repair solutions. Whether you’ve got a cracked screen, sluggish performance, a failing battery, or any other Macbook ailment, Volta PC Upgrade & Repair is there to help.
Their technicians are experienced in diagnosing and solving the full range of Macbook Repair Services. This means they can handle anything from simple fixes to complex hardware replacements. Volta PC prides itself on using high-quality replacement parts, ensuring a reliable repair that keeps your Macbook running smoothly.
What sets Volta PC apart is their commitment to transparency and affordability. They provide upfront cost estimates, so there are never hidden surprises on your bill. Plus, their prices are consistently competitive, letting you breathe easy about getting your Macbook repaired without busting your budget.
Customer satisfaction is central to their mission, and it shows in their consistently positive reviews. They offer swift diagnostic services and fast turnaround times, often getting your Macbook back in top shape within just a few days.
So, the next time your Macbook needs attention, think Volta PC Upgrade & Repair. They’ve got the expertise, competitive prices, and customer-centric approach that puts a quick and cost-effective Macbook repair within reach.

9 Best Laptop Service Centres in Singapore (2025) Singaporeans rely on laptops every day — for work, school, and personal use. When your device malfunctions,

Your MacBook is an essential tool, providing both functionality and reliability. However, encountering issues like a ghosting screen can be incredibly frustrating. This guide aims

Spill water on your Mac trackpad is a heart stopping moment for any MacBook owner. Liquid damage can cause significant problems, but quick and decisive