Did you know you can upgrade your Steam Deck SSD? The Steam Deck, a powerful handheld gaming device, has taken the gaming world by storm. Consequently, its popularity among gamers continues to soar. In essence, solid-state drives (SSDs) play a crucial role in ensuring optimal gaming performance. Therefore, this blog post aims to offer a comprehensive guide on upgrading your Steam Deck SSD for an enhanced gaming experience.
1. Understanding Steam Deck’s Storage Options
Firstly, let’s explore the two main storage options for the Steam Deck: eMMC and NVMe SSD. Essentially, eMMC storage offers lower costs but has limited performance. On the other hand, NVMe SSDs provide faster read and write speeds, resulting in improved overall gaming performance.
So, why upgrade from eMMC to a higher-capacity or faster NVMe SSD? Simply put, upgrading delivers quicker load times, smoother gameplay, and increased storage capacity for more games.
However, when choosing an SSD for your Steam Deck, keep compatibility in mind. Not all NVMe SSDs fit the device due to physical size constraints. Additionally, some SSDs might not meet the performance requirements for optimal gaming. Therefore, always check compatibility before purchasing an SSD upgrade.
2. Choosing the Right SSD for Your Steam Deck
To start, let’s compare popular NVMe SSD models suitable for the Steam Deck. Consider factors like speed, capacity, price, and brand when making your choice. Some top contenders include the Samsung 970 EVO Plus, WD Black SN750, and Crucial P5.
For different budgets and use cases, we recommend the following:
- Budget-conscious gamers: Kingston A2000 (lower cost, decent performance)
- Balanced performance seekers: WD Black SN750 (excellent performance, reasonable price)
- High-end enthusiasts: Samsung 970 EVO Plus (top-tier performance, premium price)
Lastly, don’t forget to check the physical dimensions of the SSD. Steam Deck has specific size requirements for its SSD slot. The Steam Deck’s design features a specific size requirement for its SSD slot, meaning that only certain SSDs can fit into the device. The SSD slot accommodates M.2 2230 NVMe SSDs, which are smaller and more compact than other M.2 SSD sizes like 2242, 2260, or 2280. Therefore, when upgrading your Steam Deck’s SSD, it is crucial to select an M.2 2230 NVMe SSD to ensure proper fit and compatibility with the device.
3. Preparing for the Upgrade
First and foremost, gather the essential tools and materials for the upgrade process. These include a Phillips-head screwdriver, an anti-static wrist strap, and a soft, lint-free cloth.
Next, remember to back up your Steam Deck’s data before upgrading. This precaution ensures that your saved games, settings, and personal files remain safe in case of any mishaps during the process.
Lastly, create a clean and organized workspace for the upgrade. Arrange your tools within easy reach, and clear any clutter or potential distractions. A well-prepared workspace helps streamline the upgrade process and minimizes the risk of errors or damage.
4. Step-by-Step Guide to Upgrading or Replacing Steam Deck SSD
Step 1: Firstly, prepare your device. Power off the Steam Deck, disconnect cables, and remove any microSD cards. Discharge the battery below 25% and enable battery storage mode.
Step 2: Next, remove the back cover screws with a Phillips screwdriver. Keep track of the screws to avoid damage during reassembly.
Step 3: Carefully insert an opening pick between the back cover and the front shell. Pry up the cover to release the locking clips.
Step 4: After unclipping one edge, gently pull the cover up and away from the device, and remove it entirely.
Step 5: Use tweezers to remove the foil tape covering the hidden shield screw. Avoid tearing the tape, as it will be reused.
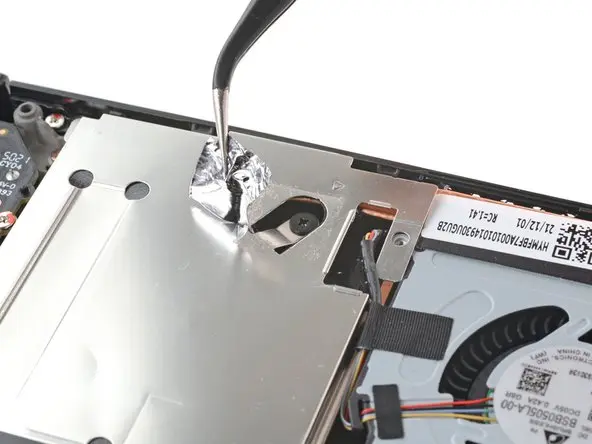
Step 6: Unscrew the three shield screws using a Phillips driver.
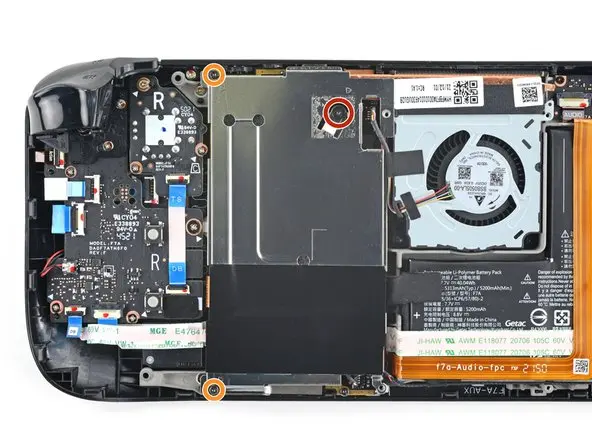
Step 7: Remove the board shield, ensuring the fan cable isn’t pinched underneath during reassembly.
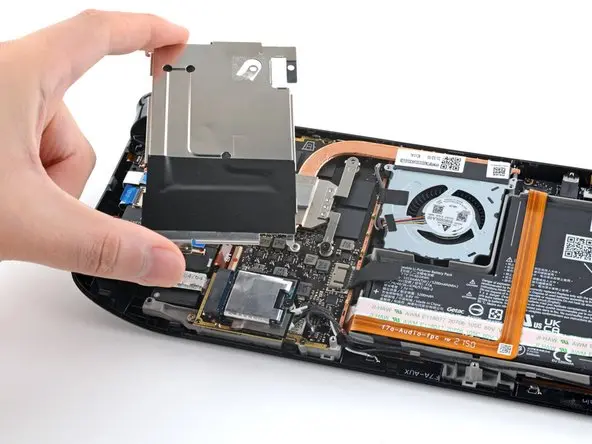
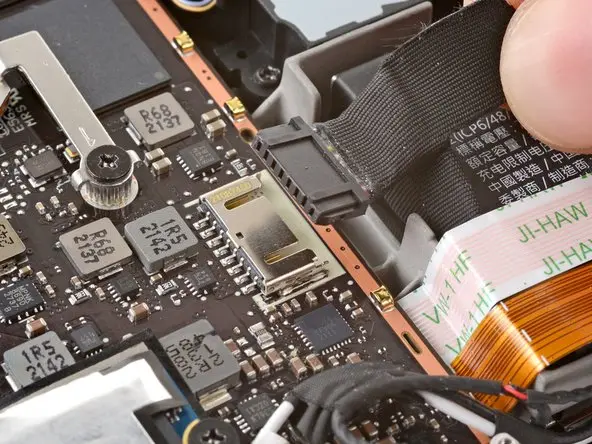
Step 8: Disconnect the battery by pulling the battery cable away from the motherboard.
Step 9: Remove the 3.4 mm screw securing the SSD with a Phillips driver.
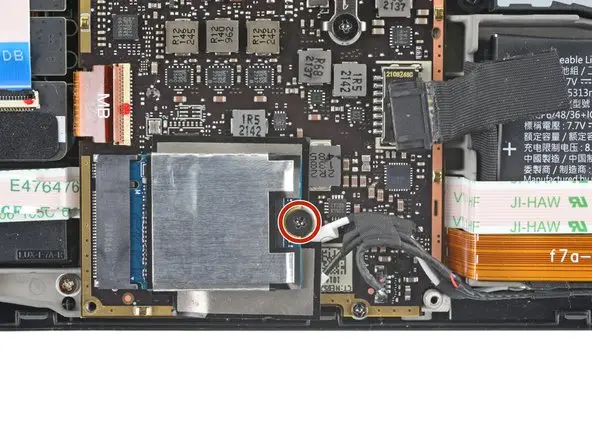
Step 10: With the SSD screw removed, the SSD will pop up at an angle. Pull it away from its M.2 board connector to remove it.
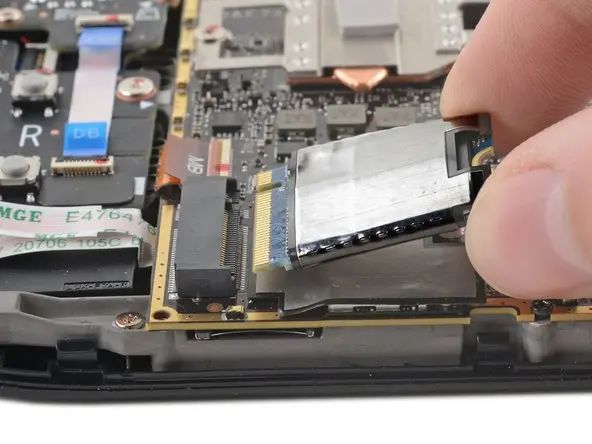
Step 11: Transfer the ESD shielding from the old SSD to the new one using tweezers. Alternatively, purchase replacement shielding if needed.
Note: This guide is based on the detailed instructions found in the iFixit blog post: Steam Deck SSD Replacement.
5. Setting Up Your New SSD
- To begin, install SteamOS on the new SSD. Download the latest SteamOS version and follow the official installation guide.
- After installation, initialize and format the SSD by following the on-screen instructions in SteamOS.
- Next, restore your backed-up data onto the new SSD. Connect your backup storage device and follow the Steam Deck recovery process.
- For optimal performance, keep your Steam Deck’s software up-to-date. Regularly check for SteamOS updates and install them accordingly.
- Finally, consider adjusting your in-game settings to match the capabilities of your upgraded SSD, ensuring a smoother gaming experience.
6. Troubleshooting Common Issues:
If your Steam Deck doesn’t power on after the upgrade, double-check all connections and ensure the battery is properly connected. Should you encounter performance issues, verify the SSD’s compatibility, and update SteamOS to the latest version. In case of unrecognized SSD, reformat the drive and reinstall SteamOS following the guide.
For any issues during the backup or data restoration process, consult Steam Deck’s data management documentation. If you still face problems, seek help from the Steam Deck community forums or contact customer support for assistance.
Also, you can consider contacting a local repair shop specializing in Steam Deck repairs for expert assistance. If you’re in Singapore and need assistance with your Steam Deck SSD upgrade or replace, consider reaching out to VOLTA PC Upgrade & Repair (FKA BudgetPC) for professional support.
Conclusion
In conclusion, upgrading your Steam Deck’s SSD brings significant performance improvements, enhancing your gaming experience. If you need help with the upgrade or repair your Steam Deck in Singapore, VOLTA PC Upgrade & Repair (FKA BudgetPC) can assist you. We encourage you to share your upgrade journey and seek assistance if needed. Happy gaming!
