
Lenovo Keyboard Not Working? Try These 12 Easy Repairs
Hello, dear readers! Have you ever found yourself in a situation where your Lenovo keyboard not working? It’s a frustrating experience, to say the least, especially when you have important tasks to complete. Whether you’re a student rushing to finish an assignment, a professional with deadlines looming, or simply someone who loves to stay connected, a malfunctioning keyboard can throw a wrench in your plans.
But don’t worry, you’re not alone, and more importantly, there’s a solution for almost every problem. In this comprehensive guide, we’ll walk you through 12 easy yet effective repairs to get your Lenovo keyboard back in tip-top shape. From basic fixes like restarting your laptop and updating drivers to more advanced solutions like disabling the keyboard cable and even getting professional help, we’ve got you covered.
So, without further ado, let’s dive into the world of Lenovo keyboard repairs and get you back on track!
1. Restart Your Laptop
Why Restarting Matters
Firstly, let’s talk about why restarting your laptop can be a game-changer. Restarting often solves minor glitches and software hiccups. It’s a quick and simple fix that can save you a lot of trouble.
Steps to Restart via Taskbar
- Locate the Start Button: On your Lenovo laptop, find the Start button on the taskbar.
- Access the Power Options: Click on the Start button. Then, select ‘Power.’
- Choose Restart: Finally, click on ‘Restart.’ Your laptop will close all open applications and initiate the restart process.
What If the Laptop Is Frozen?
Sometimes, your laptop may be unresponsive. In that case, you can use the Control+Alt+Delete method. Here’s how:
- Press Keys: Simultaneously press Control, Alt, and Delete.
- Select Power: A menu will appear. Choose the Power button in the lower right corner.
- Restart: Click on ‘Restart.’ Your laptop will close all applications and restart.
Manual Reboot
If all else fails, a manual reboot is your last resort.
- Hold the Power Button: Press and hold the power button for several seconds.
- Release and Restart: Once the laptop shuts down, press the power button again to turn it on.
Precautions
Be cautious when manually rebooting. It can result in the loss of unsaved data. So, always save your work before taking this step.
Why Regular Restarts Are Good
Regularly restarting your Lenovo laptop can prevent many issues. It’s a good habit to develop.
2. Run Windows Troubleshooter
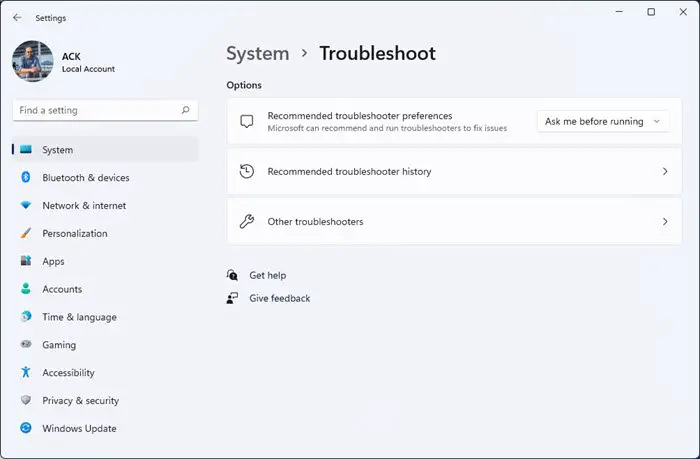
Next up, let’s dive into another simple yet effective solution for Lenovo keyboard not working: running the Windows Troubleshooter. This built-in tool can identify and fix a variety of issues, including those with your keyboard.
Why Use Windows Troubleshooter?
Windows Troubleshooter is a handy tool for diagnosing problems. It’s like having a mini technician inside your laptop. Plus, it’s already installed on your system, so no extra downloads are needed.
Steps to Run Windows Troubleshooter
- Open Settings: Click on the Start button and select the gear icon to open Settings.
- Navigate to Update & Security: Scroll down and click on ‘Update & Security.’
- Select Troubleshoot: On the left sidebar, choose ‘Troubleshoot.’
- Run the Keyboard Troubleshooter: Find the ‘Keyboard’ option and click on ‘Run the troubleshooter.’
What Happens Next?
After you initiate the troubleshooter, it will start scanning for issues. If it finds any, it will attempt to fix them automatically. Sometimes, it might ask for your permission to make changes.
Advanced Options
If the basic troubleshooter doesn’t solve the issue, you can explore advanced options. These are available in the Advanced Boot Options menu, which you can access by holding down the Shift key while clicking Restart.
When to Use Troubleshooter
Use this tool when you experience persistent keyboard issues. It’s especially useful if you’ve recently updated Windows or installed new software.
Precautions
Remember, the troubleshooter might require admin permissions. So, make sure you’re logged in as an admin before running it.
3. Update Keyboard Drivers
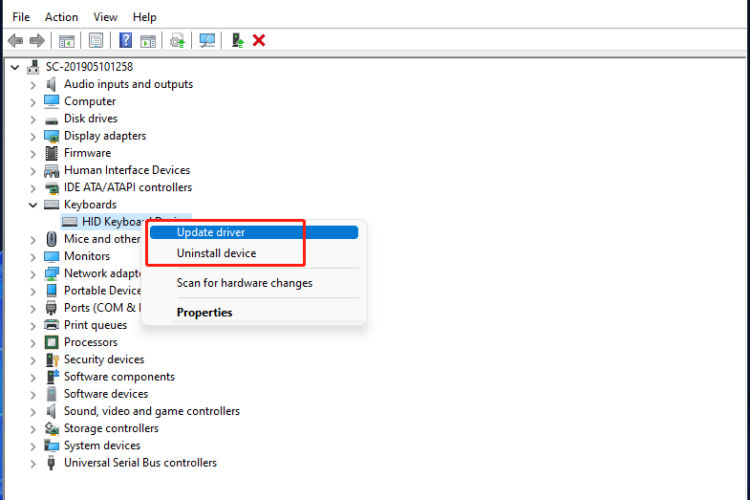
Moving on, let’s tackle another crucial step: updating your keyboard drivers. Outdated or corrupted drivers can wreak havoc on your keyboard’s functionality. Thankfully, updating them is a straightforward process.
Why Update Drivers?
Drivers act as the bridge between your hardware and software. When they’re outdated, this bridge can become unstable. So, updating them can often resolve keyboard issues.
Steps to Update Keyboard Drivers via Device Manager
- Open Device Manager: Press the Windows + X keys and select ‘Device Manager.’
- Locate Keyboards: Scroll down and expand the ‘Keyboards’ section.
- Right-Click and Update: Right-click on your keyboard driver and choose ‘Update driver.’
Automatic Update
After right-clicking, you’ll see two options. The first is ‘Search automatically for updated driver software.’ Choose this for an automatic update.
Manual Update
Alternatively, you can opt for ‘Browse my computer for driver software.’ This allows you to manually select a driver you’ve downloaded.
Lenovo’s Official Website
For Lenovo-specific drivers, visit their official website. Navigate to the ‘Driver & Software’ section and select ‘Scan Now’ for automatic updates or check for keyboard updates under ‘Manual Update’
What to Expect
Once the update is complete, your laptop will likely prompt you to restart. Make sure to do so for the changes to take effect.
Precautions
Before updating, ensure you’re logged in as an administrator. Admin permissions are often required for driver updates.
4. Disable Other Keyboards
Continuing on our troubleshooting journey, let’s focus on disabling other keyboards. You might wonder why this is necessary. Well, having multiple keyboards enabled can sometimes cause conflicts, leading to issues with your Lenovo laptop’s keyboard.
Why Disable Other Keyboards?
Multiple keyboards can confuse your system. For instance, if you have an external keyboard plugged in, your laptop might prioritize it over the built-in one. This can result in erratic behavior or even disable the built-in keyboard altogether.
Steps to Disable Keyboards via Device Manager
- Open Device Manager: Press Win + R, type
devmgmt.msc, and hit Enter. - Find Keyboards: In Device Manager, expand the ‘Keyboards’ section.
- Identify and Disable: Right-click on the keyboard you want to disable and select ‘Disable device’.
Alternative Method: Local Group Policy Editor
If you can’t disable the keyboard using Device Manager, there’s another way. Use the Local Group Policy Editor to prevent the keyboard from reinstalling every time your computer starts up. This method is more advanced and is available only on Windows Pro and Enterprise editions Lifewire.
When to Disable Other Keyboards
Consider this option if you’ve recently connected an external keyboard. Also, it’s a good step to take if you’re experiencing unexplained keyboard issues, including the “Lenovo keyboard not working” issue.
Precautions
Be cautious when disabling keyboards. Make sure you’re not disabling the one you actually want to use. Also, you may need admin permissions to make these changes.
5. Disable Keyboard Cable
We have another unique solution for you to try: disabling the keyboard cable. This method is a bit unconventional but can be effective in certain situations. It’s particularly useful if you suspect a hardware issue with your Lenovo laptop’s keyboard.
Why Disable the Keyboard Cable?
Disabling the keyboard cable can help isolate hardware issues. If your keyboard starts working after this, you’ll know the problem lies in the cable connection. It’s a diagnostic step that can provide valuable insights.
Steps to Disable the Keyboard Cable
- Shut Down Your Laptop: First, make sure to turn off your laptop completely.
- Open the Laptop: Use a screwdriver to open the back panel of your Lenovo laptop.
- Locate the Keyboard Cable: You’ll find a flat ribbon cable connected to the motherboard. This is the keyboard cable.
- Disconnect the Cable: Gently unplug the cable from its port.
Reconnect to Test
After disconnecting, turn your laptop back on. Use an external keyboard to navigate. If the built-in keyboard issues are resolved, you’ve found your culprit.
Precautions
This method involves opening your laptop, so proceed with caution. Make sure you’re grounded to avoid static electricity. Also, keep track of all screws and components.
When to Use This Method
Consider this option as a last resort. It’s most effective when you’ve tried all other methods and still experience issues.
6. Turn Off Windows Gaming Mode
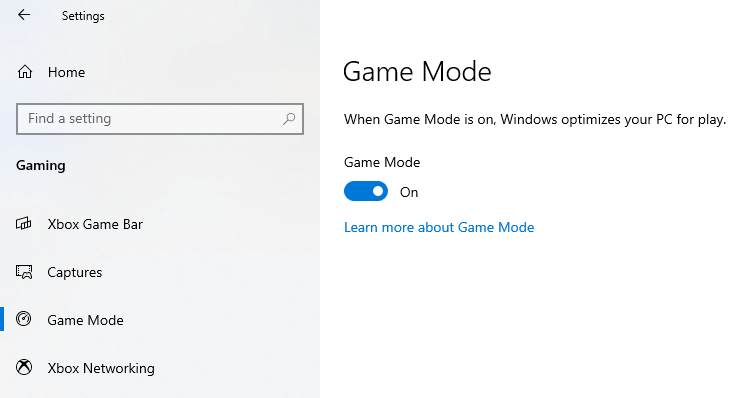
Switching gears, let’s talk about Windows Gaming Mode. This feature is designed to optimize your system for gaming. However, it can sometimes interfere with your keyboard’s performance, especially on a Lenovo laptop.
Why Turn Off Windows Gaming Mode?
Gaming Mode prioritizes game processes, which sounds great for gamers. But this can sometimes lead to keyboard issues. For example, certain keys might not respond as they should.
Steps to Turn Off Windows Gaming Mode
- Open Settings: Click the Start button and select the cogwheel icon to open Settings.
- Go to Gaming: In the Settings menu, click on the ‘Gaming’ section.
- Find Game Mode: Navigate to the ‘Game Mode’ section in the sidebar.
- Toggle Off: Simply click to toggle Game Mode off.
What Happens After?
After turning off Game Mode, your system will stop prioritizing gaming processes. This means your keyboard should function normally, without any gaming-induced hiccups.
When to Use This Method
Consider turning off Game Mode if you’re not gaming and experiencing keyboard issues. It’s a quick fix that can make a difference.
Precautions
Remember, Game Mode is generally beneficial for gaming. So, if you’re a gamer, you might want to toggle it back on later.
7. Clean Your Keyboard
Switching focus, let’s discuss a basic yet often overlooked solution: cleaning your keyboard. Believe it or not, a dirty keyboard can lead to various issues, including unresponsive keys. This would lead to your Lenovo keyboard not working.
Why Clean Your Keyboard?
Dirt, crumbs, and even oils from your fingers can accumulate over time. This buildup can interfere with key presses and even cause keys to stick.
Steps to Clean Your Keyboard
- Turn Off Your Laptop: Safety first! Make sure your laptop is off and unplugged.
- Shake It Out: Gently invert your laptop and give it a little shake to dislodge loose debris.
- Use Compressed Air: Aim a can of compressed air between the keys to blow out any remaining dust.
Deep Cleaning
For a more thorough clean, you can:
- Use a Cotton Swab: Lightly moisten it with a mild cleaning solution.
- Gently Wipe: Clean the sides of the keys and the keyboard surface.
- Dry It Off: Use a dry, lint-free cloth to wipe down the keyboard.
What About Sticky Keys?
Sticky keys can be a nuisance. To fix them:
- Remove the Keycap: Carefully pop off the affected keycap.
- Clean and Dry: Wipe it with a cloth dipped in warm soapy water. Make sure to dry it completely before reattaching.
Precautions
Always remember, never immerse your keyboard in water or any other liquid. Also, it’s generally safer to clean your keyboard when it’s unplugged to avoid accidental key presses.
8. Use an External Keyboard
Lastly, let’s consider a workaround: using an external keyboard. This is a quick and effective way to bypass any issues with your Lenovo laptop’s built-in keyboard. It’s particularly useful when you’re in a pinch and need a temporary solution.
Why Use an External Keyboard?
An external keyboard can offer better ergonomics and more features. For example, some people find it easier to type on a full-sized external keyboard than on a laptop’s built-in one.
Steps to Connect an External Keyboard
- Plug It In: Simply plug the external keyboard into a USB port on your laptop.
- Check for Compatibility: Make sure your laptop recognizes the new keyboard. It should work immediately upon plugging in Lenovo.
Wireless Keyboards
If you prefer a clutter-free setup, go for a wireless keyboard. To connect:
- Turn On Pairing Mode: On the keyboard, activate pairing mode.
- Go to Bluetooth Settings: On your laptop, navigate to Bluetooth settings.
- Select and Pair: Choose the keyboard from the list and complete the pairing process.
Multi-Device Pairing
Some external keyboards can connect to multiple devices. This feature lets you switch between your laptop, smartphone, and tablet seamlessly.
Precautions
Keep in mind, using an external keyboard won’t disable your laptop’s internal one. So, be careful not to accidentally press keys on the built-in keyboard.
9. Enable On-Screen Keyboard
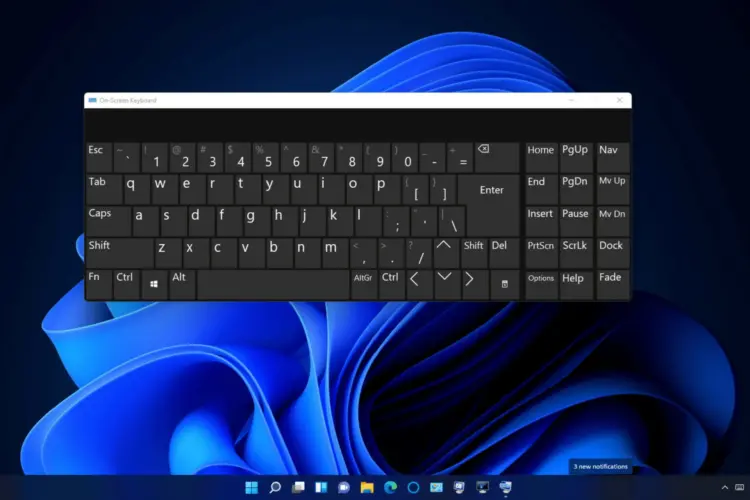
Moving on, let’s explore another quick fix: enabling the On-Screen Keyboard (OSK). This feature is particularly useful when you need to type but your physical keyboard isn’t cooperating.
Why Use the On-Screen Keyboard?
The On-Screen Keyboard serves as a virtual keyboard on your screen. It’s a great alternative when your physical keyboard fails. You can use your mouse or touchpad to type, making it a versatile tool.
Steps to Enable On-Screen Keyboard
- Go to Start: Click the Start button on your desktop.
- Navigate to Settings: Choose the Settings option.
- Select Accessibility: Click on the Accessibility section.
- Enable OSK: Turn on the On-Screen Keyboard toggle.
Shortcut Method
If you love shortcuts, you’re in luck. Simply press Win + Ctrl + O on your physical keyboard. This will instantly display the OSK.
Customizing the OSK
The OSK offers customization options. You can adjust settings like click sound, key size, and even text prediction.
Precautions
Remember, the OSK won’t disable your physical keyboard. So, be cautious when typing to avoid accidental key presses.
10. System Restore
Finally, let’s delve into a more advanced solution: System Restore. This feature allows you to revert your system settings to a previous state. It’s especially useful when you’ve exhausted all other options and are still facing keyboard issues.
Why Use System Restore?
System Restore can undo recent changes that might be causing the problem. It’s like a time machine for your computer. You can go back to a point where your keyboard was functioning correctly.
Steps to Perform System Restore
- Open Control Panel: Click the Start button and search for ‘Control Panel’.
- Navigate to Recovery: In the Control Panel, find and click on ‘Recovery’.
- Start System Restore: Click on ‘Open System Restore’ to initiate the process.
What to Expect
After initiating System Restore, your computer will restart. It will then restore your settings to the chosen point. Once completed, check if the keyboard issues are resolved.
Precautions
Be cautious when using System Restore. It will undo recent changes, but it won’t affect your personal files. Still, it’s a good idea to back up important data before proceeding.
When to Use This Method
Consider System Restore as a last resort. Use it when you’ve tried all other solutions and the problem persists.
11. Check for Software Conflicts
Next up, let’s tackle a less obvious but equally important issue: software conflicts. Sometimes, third-party software can interfere with your keyboard’s functionality. This can be especially frustrating when everything else seems to be in order.
Why Check for Software Conflicts?
Software conflicts can cause unexpected behavior in your keyboard. They can make keys unresponsive or trigger random key presses. It’s essential to identify and resolve these conflicts to ensure smooth keyboard operation.
Steps to Identify Software Conflicts
- Boot in Safe Mode: Restart your laptop and press F8 during startup. Safe Mode loads only essential drivers, making it easier to spot conflicts.
- Check Task Manager: Open Task Manager and look for any suspicious applications that might be running in the background.
- Uninstall Recent Apps: If you’ve recently installed new software, consider uninstalling it to see if it resolves the issue.
Using Diagnostic Tools
Some diagnostic tools can help you identify software conflicts. These tools scan your system and flag any issues that could be causing conflicts.
Precautions
Be cautious when uninstalling software. Make sure you know what each program does before you remove it. You don’t want to accidentally uninstall something important.
When to Use This Method
Turn to this method when you’ve ruled out hardware issues and driver conflicts. It’s a good next step in your troubleshooting journey.
12. Get Professional Help
As a last resort, you might want to consider getting professional help. Sometimes, keyboard issues can be too complex to resolve on your own. In such cases, it’s best to consult experts who can diagnose and fix the problem efficiently.
Why Opt for Professional Help?
Professional technicians have the tools and expertise to tackle even the most complicated issues. They can perform in-depth diagnostics and offer solutions that you might not have considered.
Where to Fix Lenovo Keyboard not Working in Singapore: Volta PC Upgrade & Repair
For those residing in Singapore, we highly recommend Volta PC Upgrade & Repair. They offer specialized services for Lenovo laptop repair and have a proven track record of resolving Lenovo keyboard not working issue(s).
Address:
Tai Seng Branch: 8 Burn Road #01-04, Trivex, Singapore 369977
Jurong Branch: Blk 132 #01-279C, Jurong Gateway Road, Singapore 6001324
- Contact:
Whatsapp us | Call 69500453 | Telegram us
Precautions
Before handing over your laptop, make sure to back up all important data. Also, inquire about the service warranty and read customer reviews to make an informed decision.
Frequently Asked Questions (FAQs) on Lenovo Keyboard Not Working
Why is my Lenovo laptop keyboard not typing?
There could be several reasons why your Lenovo laptop keyboard is not typing. It could be due to hardware issues, outdated drivers, software conflicts, or even incorrect settings. To diagnose the issue, you can try restarting your laptop, updating drivers, or running Windows Troubleshooter.
How do I fix my Lenovo keyboard not working?
To fix a non-working Lenovo keyboard, you can try the following steps:
- Restart your laptop.
- Run Windows Troubleshooter.
- Update keyboard drivers.
- Disable other keyboards.
- Disable the keyboard cable.
- Turn off Windows Gaming Mode.
- Clean your keyboard.
- Use an external keyboard.
- Enable On-Screen Keyboard.
- Perform a System Restore.
- Check for software conflicts.
- Get professional help.
Each of these methods has its own set of procedures, so it’s best to go through them one by one until you find the solution that works for you.
How do I fix my keyboard not typing?
If your keyboard is not typing, you can try the following general troubleshooting steps:
- Restart your computer.
- Check if the keyboard is properly connected.
- Run hardware diagnostics.
- Update or reinstall keyboard drivers.
- Check for software conflicts.
- Use an external keyboard to see if the issue persists.
- Perform a System Restore to revert to a point where the keyboard was working.
Why is my Lenovo keyboard locked?
A locked Lenovo keyboard could be due to various factors such as a disabled keyboard setting, a function key being pressed, or even a software glitch. To unlock it, you can try pressing the ‘Fn’ key along with the ‘F6’ or ‘Num Lock’ key. Alternatively, you can go to the device manager and enable the keyboard if it’s disabled.

