How to Fix Laptop TPM (Trusted Platform Module) Errors
Laptops rely on various components to ensure security and functionality. One of these critical components is the Trusted Platform Module (TPM). TPM plays a significant

Imagine this: you’re gearing up for an important video call, and suddenly, your laptop greets you with silence. No sound comes from its speakers. Frustrating, right? Well, you’re not alone. Sound issues on laptops are as common as they are annoying. Fortunately, they’re often more of a misstep than a march to the repair shop.
In this post, we’ll guide you through a symphony of solutions. From basic checks to advanced maneuvers, we’ll cover all the bases. So, grab a seat, and let’s turn the silence into a soundtrack of success.
Table of content:
Before you dive into more complex troubleshooting, let’s start with the basics. Preliminary sound checks are crucial. They can save you time and possibly a trip to the repair shop.
It’s a common slip-up. Look for the speaker icon on the taskbar. Is there an ‘X’ next to it? If yes, click it to unmute. Also, press the volume keys on your keyboard. Watch the on-screen volume bar rise and fall.
Right-click the speaker icon. Click ‘Playback devices’. Make sure your preferred device is set as default. If not, set it and test the sound.
It’s a handy tool. Press the Windows key. Type ‘Find and fix audio’. Select the option that appears. Follow the prompts. The troubleshooter will check for issues and suggest fixes.
They might be stuck. Press ‘Ctrl + R’. Type ‘services.msc’. Hit enter. Scroll to ‘Windows Audio Service’. Right-click it. Select ‘Restart’. This action can refresh your audio system.
Are your headphones plugged in properly? Is the speaker cable secure? These connections can loosen over time. Ensure they’re snug and secure.
Remember, these steps are your first line of defense.According to Microsoft Support, they resolve many common sound issues. So, give them a try. You might just fix the problem without needing further help.
Alright, let’s dive into some hands-on solutions. First off, a simple restart can work wonders. It’s the age-old turn-it-off-and-on-again trick. This step clears your laptop’s memory and can solve many minor glitches. So, hit that restart button and give your system a fresh start.
If your laptop’s speakers are silent, plug in a pair of headphones. Does sound return? If yes, your internal speakers might be the issue. No luck? Don’t worry, we’re just getting started.
Sometimes, it’s as simple as a dusty or loose connection. A gentle blow or a careful wiggle could reveal the problem. Also, consider the possibility of a digital connection like Bluetooth. Pair your laptop with an external speaker. This can bypass potential internal hardware issues.
Remember, these steps are not just shots in the dark. According to a GCFGlobal article on basic troubleshooting, restarting your computer can solve a multitude of issues. It’s a tried and true method recommended by tech experts. And as for external devices, they’re not just for expanding your sound. They’re a diagnostic tool. They help you pinpoint whether the problem is internal or external.
So, before you leap into more complex territory, ensure you’ve given these simpler solutions their due diligence. They’re straightforward, effective, and often overlooked. Plus, they might just save you a trip to the tech expert.

So, you’ve tried a reboot and tested external devices. Still no sound on laptop? Let’s roll up our sleeves and tweak some settings.
Here’s how you do it: open ‘Settings’, click on ‘System’, and then select the ‘Sound’ page. Simple, right?
Now, you’re in the driver’s seat. If you have multiple audio devices, you can choose which one to use. Just click on ‘Choose where to play sound’ and select your preferred device. This could be your built-in speakers, headphones, or an external speaker. It’s all about what works for you.
So, if you’re juggling between a video conference and your favorite game, they don’t have to compete for sound. Just go to the ‘Advanced’ section and adjust the ‘Volume mixer’ settings. Assign different apps to different audio devices. Neat, isn’t it?
It’s like giving your ears a treat with a 3D sound experience. To enable it, click on your speakers in the ‘Sound’ settings and select the ‘Spatial audio’ option. Choose ‘Windows Sonic for Headphones’ for an immersive audio experience. It’s like being in the middle of the action, without leaving your desk.
But sometimes, less is more. If you’re facing audio issues, turning off audio enhancements might help. In the same ‘Sound’ settings, under ‘Output’, click on your speakers and turn off the ‘Audio enhancements’ toggle. This can resolve conflicts that cause sound problems.
Remember, these aren’t just random tips. They come straight from the experts. Windows Central provides a detailed guide on managing sound settings for the best audio experience on Windows 11. And Microsoft Support confirms that keeping your audio drivers up to date is crucial. They also suggest using the generic audio driver that comes with Windows as a fallback.
So, give these settings a whirl. With a few clicks, you might just solve your sound saga. And you’ll do it with the confidence of having the latest advice from the tech world.

Now, let’s get to the heart of your laptop’s sound system: the drivers. Think of drivers as the translators between your laptop’s hardware and its software. When they’re out of date, things get lost in translation. So, updating them is key to fix no sound on laptop.
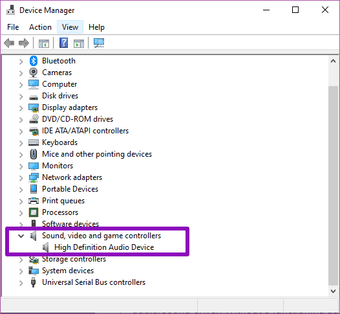
Just type ‘device manager’ in the search box on the taskbar and select it from the results. Then, expand the ‘Sound, video and game controllers’ section. You’ll see your sound card listed there.
Select ‘Search automatically for updated driver software’. Your laptop will then scour the internet for the latest version. If it finds one, follow the prompts to install it. Sometimes, this is all it takes to get your sound back on track.
Head over to the device manufacturer’s website. They often have the latest drivers ready for download. Just make sure to follow their installation instructions.
Again, in Device Manager, right-click on the sound card and select ‘Uninstall device’. Check the box to ‘Delete the driver software for this device’, then hit ‘Uninstall’. After a restart, Windows will attempt to reinstall the driver for you.
In Device Manager, right-click on the sound card, select ‘Properties’, and then the ‘Driver’ tab. Hit ‘Roll Back Driver’ if the option is available. This moves you back to the previous version of the driver.
Remember, these aren’t just shots in the dark. Microsoft Support confirms that outdated or malfunctioning drivers are often to blame for sound issues. They recommend these steps as a first line of defense.
So, give your drivers some attention. With the right update or a fresh install, your laptop’s sound should be as good as new. And you’ll have saved yourself from a silent computer nightmare.
Now, onto a powerful ally in your quest for sound: Windows’ built-in troubleshooters. These are like your digital detectives, designed to solve mysteries without the legwork. Let’s put them to use.
For Windows 11, right-click the Start button and select ‘Settings’. Then, choose ‘System’ and scroll down to ‘Troubleshoot’. Click on ‘Other troubleshooters’. Here, you’ll find a list, including the ‘Playing Audio’ troubleshooter. For Windows 10, press Win+I, go to ‘Update & Security’, and then ‘Troubleshoot’.
Click it and let Windows do its thing. It’ll check for common sound problems and attempt to fix them automatically. This tool is quite the handyman, often fixing issues you didn’t know you had.
It might suggest next steps or identify underlying problems. This insight is invaluable. It’s like having a conversation with your laptop about what’s wrong.
And here’s a bonus. The troubleshooter can sometimes direct you to additional help. It might guide you to update drivers or tweak other settings. It’s a stepping stone to a solution.
According to The Windows Club, Microsoft has enhanced the troubleshooter functionality in Windows 11 and 10. They’ve made it more intuitive and user-friendly. So, you’re getting a tool that’s been refined based on user feedback and technical advancements.
In short, don’t overlook the troubleshooters. They’re built into your system for a reason. They’re quick, they’re easy, and they often get the job done. Give them a shot before moving on to more complex solutions. You might be pleasantly surprised by their effectiveness
When software fixes don’t cut it, it’s time to consider hardware issues. Yes, it’s a bit daunting, but let’s break it down. Your laptop’s silence could be a shout for hardware help.
For Windows 11 and 10, there’s a hardware troubleshooter built right in. Here’s the drill: navigate to ‘Settings’, then ‘System’, and click ‘Troubleshoot’. Choose ‘Other troubleshooters’, and run the one for hardware. It’s like a health check-up for your laptop’s internals.
Look at the speakers and audio ports. Any wear and tear? Sometimes, the issue is as clear as day. A damaged speaker or a bent audio jack can be the culprits.
Open the Device Manager. Look for any yellow exclamation marks. These are SOS signals from your devices. They mean something’s up. Right-click on the sound card, select ‘Properties’, and check the ‘Device status’. This tells you if the device is singing or sobbing.
Internal wiring can be tricky. If you’re not comfortable opening up your laptop, a tech expert should be your next call.
Remember, hardware issues can be subtle. According to Windows Central, error codes in Device Manager can guide you. They’re like clues to what’s wrong. For instance, ‘error code 10’ means the device can’t start. That’s a direct lead on what to fix.
In short, don’t ignore the possibility of a hardware hiccup. Use the tools Windows provides. Check for physical damage. And when in doubt, seek out a professional. With a little detective work, you can find the silent offender.
Sometimes, the conventional fixes just don’t do the trick. That’s when alternative solutions come into play. Let’s explore some less common, but potentially effective, ways to restore your laptop’s sound.
Have you checked the volume settings? It’s easy to overlook. Make sure your laptop isn’t muted or turned down too low. This might seem obvious, but it’s a common oversight.
These are the backstage crew of your laptop’s sound system. On Windows, you can restart these services. Press ‘Ctrl + R’, type ‘services.msc’, and hit enter. Find ‘Windows Audio Service’, right-click, and select ‘Restart’. This can sometimes kickstart your sound back to life.
Use external speakers or a headset to do this. If they work, the issue might be with your laptop’s speakers. Check if they are accidentally disabled in your sound settings.
Wireless devices, in particular, can sometimes cause audio disruptions. Try turning off nearby wireless gadgets to see if that clears up the sound.
Not just driver updates, but system updates too. They can resolve a myriad of issues, including sound. Go to ‘Settings’, then ‘Update & Security’, and check for updates. Install any that are pending.
These tips aren’t just guesswork. Carisinyal.com suggests these as practical steps when the usual methods fail. They remind us that sometimes, the solution is simpler than we think.
In summary, when faced with stubborn sound issues, think outside the box. Check the basics, restart audio services, test with external devices, eliminate interference, and update your system. One of these alternative solutions might just be the answer you’re looking for.
Prevention is better than cure, especially when it comes to your laptop’s sound. Let’s look at some best practices to keep your audio crisp and clear.
If sound is crucial for you, choose a laptop known for good audio. HowToGeek suggests considering models like the MacBook Pro or the Dell XPS series, which boast superior built-in speakers.
It’s not just a fix; it’s maintenance. Microsoft Support advises regularly checking for driver updates to avoid sound issues. This proactive step can save you a lot of trouble down the line.
Keep liquids away, and don’t blast the volume to the max. High volumes can damage speakers over time. Treat them gently to extend their life.
Quality headphones or speakers can provide a better sound experience. They can also reduce wear and tear on your laptop’s built-in speakers.
Laptop speakers have physical limitations. If you’re after studio-quality sound, external speakers or professional headphones might be the way to go.
To fix the sound on your laptop, follow these steps:
If your laptop’s sound is cutting out, try the following:
While it’s not common, a virus or malware can indeed affect your laptop’s sound by altering system settings or corrupting drivers. Run a full system antivirus scan to check for malware. If a virus is found, remove it and see if your sound returns. Additionally, ensure your operating system and security software are up-to-date to prevent such issues.
If your laptop isn’t playing sound through headphones or external speakers, check the following:
Even after you’ve tried every trick in the book, there are times when the sound issue on your laptop persists. That’s when you know it’s time to call in the cavalry — the professionals. Let’s discuss when to wave the white flag and seek expert assistance.
These are SOS calls from your laptop, signaling deep-seated issues. HP’s support page warns that such symptoms often lead to laptop repair.
If there’s visible damage or if it’s suffered a fall, internal components could be affected. This isn’t a DIY fix. Professional technicians have the tools and expertise to diagnose and mend hardware problems safely.
These are classic signs of hardware failure. As per GreenTek Solutions, these symptoms could indicate serious issues with internal components like the cooling system or the motherboard.
Persistent software troubles that resist all forms of troubleshooting suggest deeper problems. A professional can offer a comprehensive diagnosis that’s beyond the reach of built-in troubleshooters.
These problems can escalate quickly, leading to significant data loss or privacy concerns. Experts can often recover lost data and secure your laptop against future threats.
In conclusion, when your laptop’s sound issues are accompanied by these warning signs, professional help is not just an option; it’s a necessity. Relying on expert repair services can save you time, protect your data, and extend the life of your laptop.
If you’re in Singapore and your laptop has succumbed to the silent treatment, there’s a local solution that stands out — Volta PC Upgrade & Repair. This service comes highly recommended for their expertise in diagnosing and fixing laptop sound issues. At Volta PC Upgrade & Repair, they understand the nuances of laptop audio problems and offer tailored solutions to bring the music back to your ears.
Their approach is thorough: they’ll run diagnostics to pinpoint the exact cause of your audio woes and then apply their technical know-how to fix the issue. Whether it’s a software glitch or a hardware hiccup, Volta PC Upgrade & Repair is equipped to handle it.
So, if your laptop’s silence is deafening, give Volta PC Upgrade & Repair a call. They’re the go-to professionals who can turn the volume back up on your device. Remember to reach out to them directly to ensure they can address your specific needs and to confirm their availability.
Address:
Tai Seng Branch: 8 Burn Road #01-04, Trivex, Singapore 369977
Jurong Branch: Blk 132 #01-279C, Jurong Gateway Road, Singapore 6001324

Laptops rely on various components to ensure security and functionality. One of these critical components is the Trusted Platform Module (TPM). TPM plays a significant

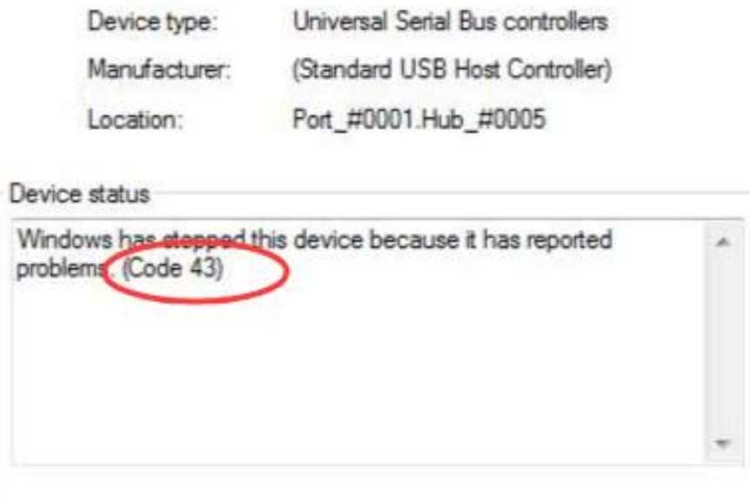
Encountering ‘Error Code 43’ in Device Manager can be frustrating, especially when it disrupts your workflow. This error typically indicates that Windows has stopped a

Laptop charging circuit problems are common and can stem from various sources, impacting the device’s functionality and user experience. Issues can range from a simple
|
*CLOSED ON 28-30 JAN 2025 (CHINESE NEW YEAR) |